Concert pitch · conservatoire system · 27 notes
Oboe Fingering Chart
Tap any note from low B♭ to C6 to see exactly which keys to press — including the half-hole and both octave keys — and hear the pitch. The oboe plays at concert pitch, so what you read is what you hear. Print the full chart free below.
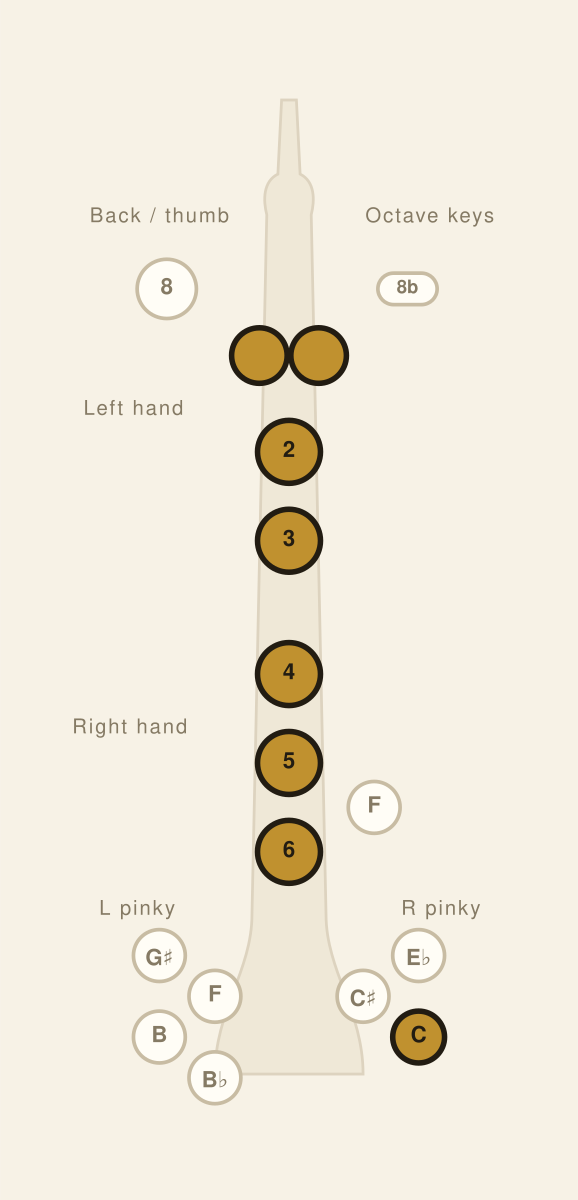
All six fingers plus the low C key for the right little finger — the first bottom note most beginners get reliably. Start it with a gentle tongue and plenty of air; the low register stops speaking the moment the air slows.
Everything about C4 on oboe →How to read this chart
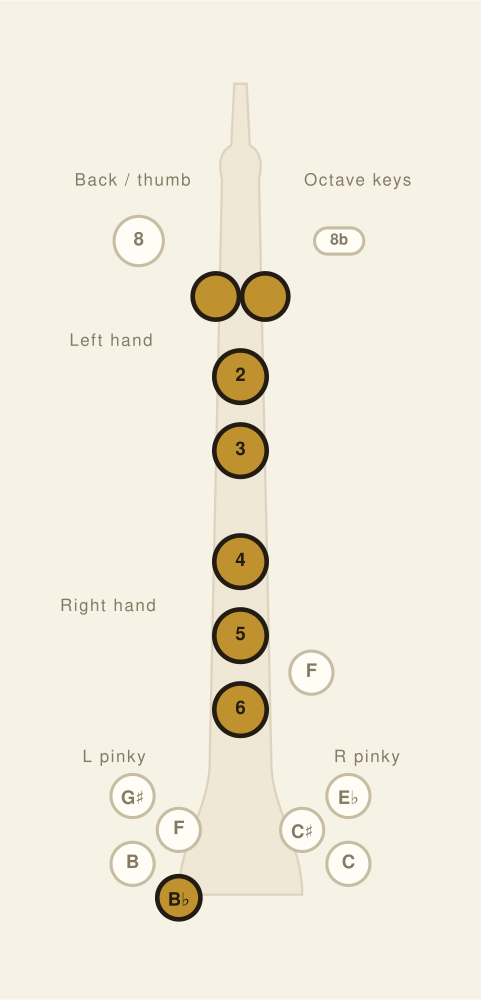
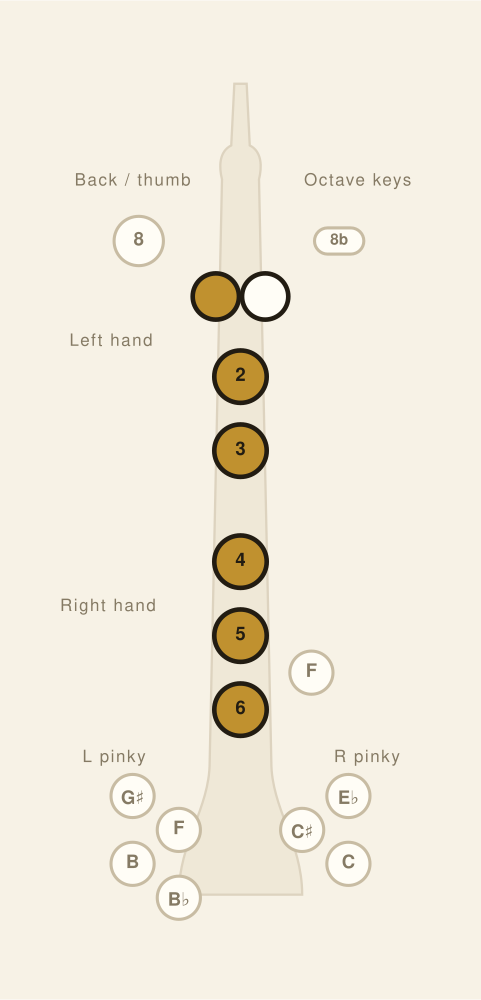
Filled circles are pressed, open circles are not. The diagram runs top to bottom: the first octave key on the back at the top left (left thumb) and the second octave key to the right (side of the left index finger), then the left hand’s three plates, the right hand’s three with the F key beside the ring finger, and the little-finger clusters at the bottom — G♯, left F, low B and low B♭ on the left; E♭, low C♯ and low C on the right.
The left index plate is drawn as a pair of circles because it has two states. Both filled means the plate is fully covered; the outer circle open means the half-hole — the finger rolled down to uncover the small vent in the plate for C♯5, D5 and E♭5.
Half-hole and octave keys: how the oboe changes register
The oboe overblows the octave, so the second octave repeats the first octave’s fingerings with something extra to make the higher harmonic speak. What that something is depends on the note. From written B♭3 to C5 nothing is needed — the plain first octave. C♯5, D5 and E♭5 are the half-hole notes: finger low C♯, D or E♭ and roll the left index finger to open its vent. From E5 to G♯5 the vent gives way to the first octave key under the thumb; from A5 to C6 the second octave key at the side takes over.
Getting the switch points right is most of learning the oboe’s second octave. D5 is the note beginners try to play with the octave key — it needs the half-hole and no thumb key at all. On oboes with an automatic octave mechanism the change between the two octave keys happens by itself, but the half-hole never does.
Regular F, forked F and left F
F is the oboe’s awkward note, and there are three ways to play it. The regular F is left hand down, right index finger, and the F key pressed by the right ring finger instead of hole 6. The forked F keeps the ring finger on hole 6 and leaves the F key out — right index and ring fingers, with the E♭ key added on oboes that lack an F resonance key — and it is the one to use when the note before or after is D, E♭ or C, where the right ring finger is already committed. The left F lever, on instruments that have it, plays F from the left little finger and sidesteps the problem entirely.
All three are in the chart above and the same three apply an octave up at F5 with the thumb octave key. Choosing by context rather than habit is what makes F–E♭ and F–D passages stop feeling clumsy.
Full oboe fingering chart — all notes
The standard two octaves, written B♭3 to C6, chromatically. The oboe is a concert-pitch instrument, so there is no separate sounding-pitch column: the note you read is the note you hear.
Octave 32 notes
B♭3
B3
Octave 412 notes
C4 (beginner note)
C♯4
D4 (beginner note)
E♭4 (beginner note)
E4 (beginner note)
F4 (beginner note)
F♯4 (beginner note)
G4 (beginner note)
G♯4
A4 (beginner note)
B♭4 (beginner note)
B4 (beginner note)
Octave 512 notes
C5 (beginner note)
C♯5
D5 (beginner note)
E♭5
E5 (beginner note)
F5 (beginner note)
F♯5 (beginner note)
G5 (beginner note)
G♯5
A5
B♭5
B5
Octave 61 note
C6
Pressed or coveredOpenBeginner note
The same chart, written out
Every fingering in words — handy for copying into lesson notes, and it reads aloud properly on a screen reader.
| Written note | Fingering | Beginner |
|---|---|---|
| B♭3 | Left index plate + Left middle plate + Left ring plate + Right index plate + Right middle plate + Right ring plate + Low B♭ key (left little finger) | — |
| B3 | Left index plate + Left middle plate + Left ring plate + Right index plate + Right middle plate + Right ring plate + Low B key (left little finger) | — |
| C4 | Left index plate + Left middle plate + Left ring plate + Right index plate + Right middle plate + Right ring plate + Low C key (right little finger) | Yes |
| C♯4 | Left index plate + Left middle plate + Left ring plate + Right index plate + Right middle plate + Right ring plate + Low C♯ key (right little finger) | — |
| D4 | Left index plate + Left middle plate + Left ring plate + Right index plate + Right middle plate + Right ring plate | Yes |
| E♭4 | Left index plate + Left middle plate + Left ring plate + Right index plate + Right middle plate + Right ring plate + E♭ key (right little finger) | Yes |
| E4 | Left index plate + Left middle plate + Left ring plate + Right index plate + Right middle plate | Yes |
| F4 | Left index plate + Left middle plate + Left ring plate + Right index plate + F key (right ring finger) | Yes |
| F♯4 | Left index plate + Left middle plate + Left ring plate + Right index plate | Yes |
| G4 | Left index plate + Left middle plate + Left ring plate | Yes |
| G♯4 | Left index plate + Left middle plate + Left ring plate + G♯ key (left little finger) | — |
| A4 | Left index plate + Left middle plate | Yes |
| B♭4 | Left index plate + Right index plate | Yes |
| B4 | Left index plate | Yes |
| C5 | Left middle plate | Yes |
| C♯5 | Left index plate (half) + Left middle plate + Left ring plate + Right index plate + Right middle plate + Right ring plate + Low C♯ key (right little finger) | — |
| D5 | Left index plate (half) + Left middle plate + Left ring plate + Right index plate + Right middle plate + Right ring plate | Yes |
| E♭5 | Left index plate (half) + Left middle plate + Left ring plate + Right index plate + Right middle plate + Right ring plate + E♭ key (right little finger) | — |
| E5 | First octave key (left thumb) + Left index plate + Left middle plate + Left ring plate + Right index plate + Right middle plate | Yes |
| F5 | First octave key (left thumb) + Left index plate + Left middle plate + Left ring plate + Right index plate + F key (right ring finger) | Yes |
| F♯5 | First octave key (left thumb) + Left index plate + Left middle plate + Left ring plate + Right index plate | Yes |
| G5 | First octave key (left thumb) + Left index plate + Left middle plate + Left ring plate | Yes |
| G♯5 | First octave key (left thumb) + Left index plate + Left middle plate + Left ring plate + G♯ key (left little finger) | — |
| A5 | Second octave key (left index side) + Left index plate + Left middle plate | — |
| B♭5 | Second octave key (left index side) + Left index plate + Right index plate | — |
| B5 | Second octave key (left index side) + Left index plate | — |
| C6 | Second octave key (left index side) + Left middle plate | — |
Alternate oboe fingerings
Alternates aren’t “better” fingerings — each one earns its place in a specific musical situation. Select any of these notes in the chart above and switch variants to compare them.
- F4 (F4) — Forked F (right index and ring fingers, with the E♭ key): Left index plate + Left middle plate + Left ring plate + Right index plate + Right ring plate + E♭ key (right little finger). Approaching from or moving to D, E♭ or C, where the right ring finger is free and the regular F key would be awkward. The E♭ key can be left off on oboes with an F resonance key. — Left F (left little-finger F lever): Left index plate + Left middle plate + Left ring plate + Right index plate + Left F lever (left little finger). When neither the regular nor the forked fingering fits — F next to E♭ or D♯, for example — on oboes fitted with the left F key.
- F5 (F5) — Forked F (right index and ring fingers, with the E♭ key): First octave key (left thumb) + Left index plate + Left middle plate + Left ring plate + Right index plate + Right ring plate + E♭ key (right little finger). Approaching from or moving to D, E♭ or C, where the right ring finger is free and the regular F key would be awkward. The E♭ key can be left off on oboes with an F resonance key. — Left F (left little-finger F lever): First octave key (left thumb) + Left index plate + Left middle plate + Left ring plate + Right index plate + Left F lever (left little finger). When neither the regular nor the forked fingering fits — F next to E♭ or D♯, for example — on oboes fitted with the left F key.
Common oboe fingering mistakes
- Lifting the finger for the half-hole. The left index finger rolls down to open the vent; it never comes off the plate. Lifting it gives a different, wrong note.
- Using the octave key on D5. D5, C♯5 and E♭5 are half-hole notes. The thumb key belongs to E5 and above.
- Always playing regular F. Next to D, E♭ or C the forked F (or left F) is the fingering that connects. Learn all three and choose by context.
- Blaming yourself for low B♭ and B. The bottom two notes are the first to fail when a reed is tired or the bell key is not seating. Check the instrument and the reed before changing your embouchure.
Frequently asked questions
Which oboe system is this chart for?
The conservatoire (French) system that virtually every student and professional oboe outside the UK uses, and that most UK students now play too. Thumbplate-system oboes differ only in how B♭ and C are fingered in the first octave — everything else on this chart applies to them as well.
What is the half-hole on the oboe?
The left index finger's plate has a small vent in it. For written C♯5, D5 and E♭5 you roll the finger down so that vent opens while the rest of the plate stays covered — that is the half-hole, and it does the job the octave key does higher up. Roll, do not lift: the finger never leaves the plate.
When do I use the first octave key and when the second?
The first octave key, under the left thumb, covers written E5 to G♯5. The second, pressed with the side of the left index finger, covers A5 to C6. Many oboes have a semi-automatic or automatic octave mechanism that manages the switch for you, but the chart shows both so the fingering is right on any instrument.
Why does the chart stop at C6?
Because C6 is the top of the second octave, and up to there the fingerings are standard on every conservatoire oboe. The notes above it — C♯6 to G6 — use altissimo fingerings that differ between makers, systems and players, so no single chart is safe to print as standard. Ask your teacher for the fingerings that speak on your instrument.
Can I print this chart free?
Yes. The printable PDF (Letter and A4) is generated from the same data as this interactive chart and downloads in one click — no email address, no watermark.
Oboe fingering data last updated . Every diagram here, in the printable PDF and in the chart image comes from one dataset, so the paper and the screen cannot disagree.
Every other band instrument is on the instrument index.