Concert pitch · Boehm system · 37 notes
Flute Fingering Chart
Every note from low C to the top of the third octave, one diagram at a time. Tap a note to see exactly which keys to hold, hear the pitch and read it on the staff — then print the whole chart free.
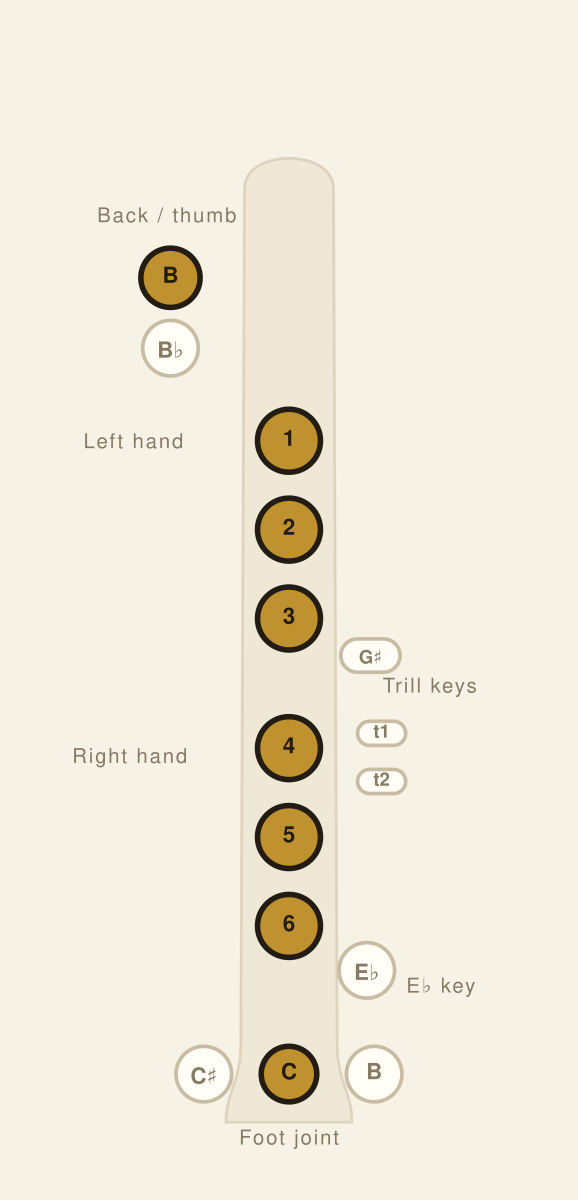
The lowest note on a C-foot flute: everything down, with the right little finger reaching past the E-flat key to the long C lever. It needs slow, warm, generous air and a slightly more open embouchure — faster air just cracks it up to the octave. Low C is habitually flat and stuffy on student flutes, so aim the air lower across the lip plate instead of blowing harder.
Everything about C4 on flute →How to read this chart
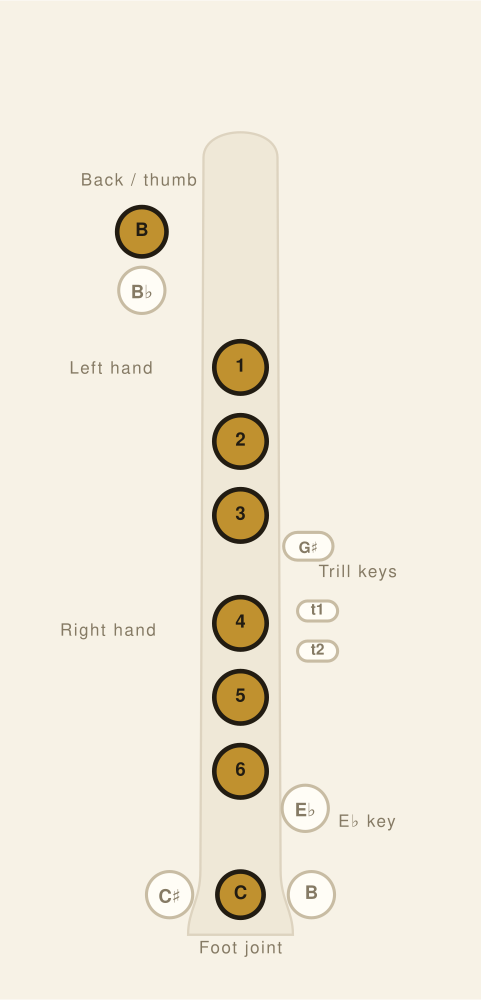
Filled circles are keys you press; open circles stay up. The diagram is drawn vertically with the head joint at the top and the foot joint at the bottom, so it reads the way the flute lies across you: the two thumb keys are on the back at the top, the left hand’s three keys come next down the centre with the G♯ lever beside them, then the right hand’s three, and the little-finger keys sit at the bottom. The two small levers offset to the right are the trill keys.
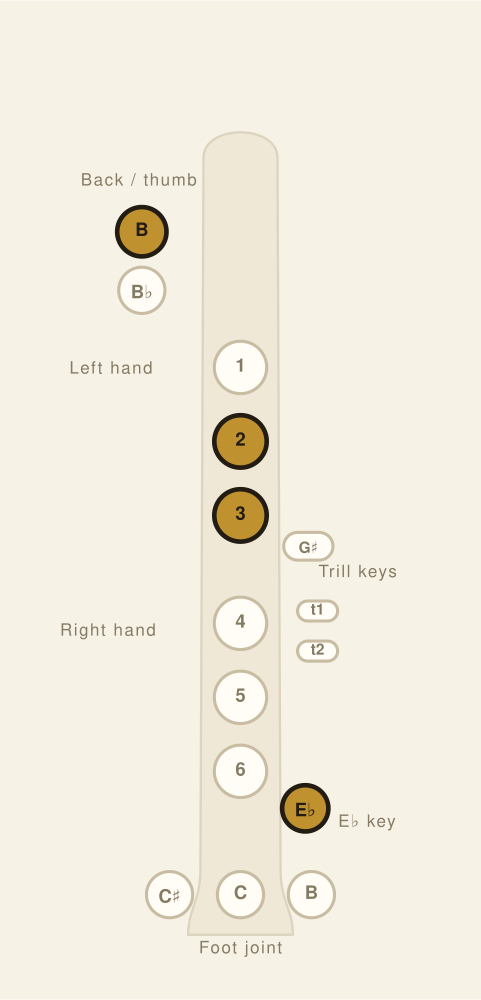
The one convention that catches every beginner out is the E♭ key — the pad under the right little finger. It opens a tone hole instead of closing one, so pressing it makes the pitch go up. That is why it is drawn down on almost every diagram from E♭4 upward: it is the little finger’s home position, not an extra. It lifts for D4 and D5, gives way to a foot-joint lever for C♯4 and C4, and comes off again for the very top notes B♭6, B6 and C7. If a low note keeps arriving a semitone sharp, that little finger is the first thing to check.
First, second and third octave — what actually changes
The flute has no register key. Octaves come from the air: a faster, more focused airstream through a smaller lip aperture, aimed a little higher across the lip plate. Most of the second octave therefore reuses the first-octave fingering exactly — E5 is the low-E fingering overblown, F5 is low F, and so on up to C♯6.
The exceptions are at the bottom of the second octave. D5 and E♭5 lift the left first finger, which vents the tube and lets the second harmonic settle. Leaving that finger down is the single most common second-octave fault on flute: you get a stuffy, flat D that cracks the moment you push. It is worth drilling low D → D5 slowly, watching only the left index finger.
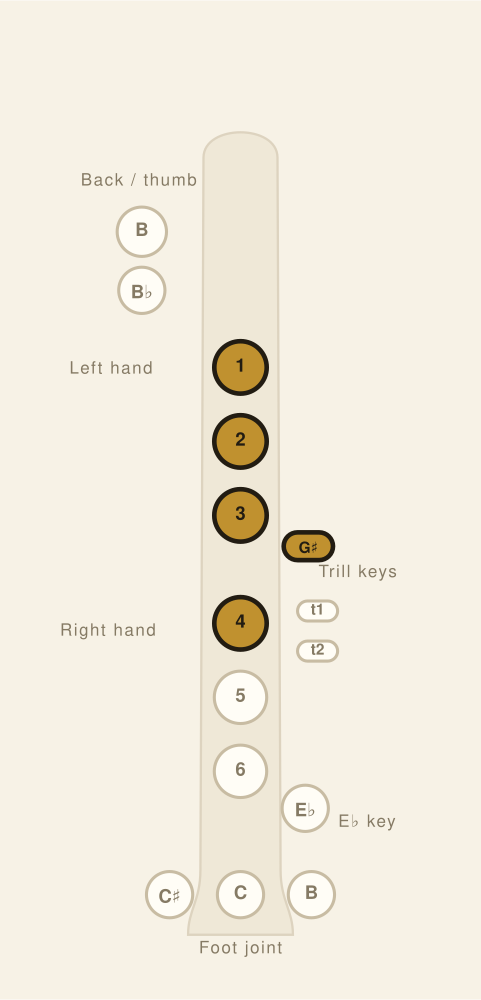
The third octave changes again, and this time properly. From D6 upward the fingerings are harmonic venting patterns — high D is the third harmonic of G4 with the left first finger off, high E-flat is every finger down plus the G♯ key, high F leaves a gap in the middle of the left hand. They look wrong and they are right. Trying a second-octave fingering up there produces a squeak, not a note. The whole register is covered in detail on the flute high notes chart.
The two B♭ fingerings — one-and-one or thumb B♭
B♭ is the first note where flute players get a genuine choice, and both fingerings are on the chart above. The method-book fingering is “one and one”: left first finger plus right first finger, with the thumb still on the B key. Learn this one first. It lets you move freely between B♭ and B natural, and keeping a right-hand finger down balances the flute better.
The alternate is the thumb B♭, or Briccialdi lever — the second, lower thumb key. The thumb simply lives on it for a whole passage, which is a gift in flat keys like B♭, E♭ and A♭ major. The catch is B natural: if one turns up while your thumb is parked on the B♭ lever, you get B♭ instead. Use the thumb lever when the passage has no B natural in it, and use one-and-one everywhere else.
Full flute fingering chart — all notes
The complete range of a C-foot student flute, low C to high C, chromatically. The flute is a concert-pitch instrument, so the written note is the note that sounds.
Octave 412 notes
C4 (beginner note)
C♯4 (beginner note)
D4 (beginner note)
E♭4 (beginner note)
E4 (beginner note)
F4 (beginner note)
F♯4 (beginner note)
G4 (beginner note)
A♭4 (beginner note)
A4 (beginner note)
B♭4 (beginner note)
B4 (beginner note)
Octave 512 notes
C5 (beginner note)
C♯5 (beginner note)
D5 (beginner note)
E♭5 (beginner note)
E5 (beginner note)
F5 (beginner note)
F♯5 (beginner note)
G5 (beginner note)
A♭5
A5
B♭5
B5
Octave 612 notes
C6
C♯6
D6
E♭6
E6
F6
F♯6
G6
A♭6
A6
B♭6
B6
Octave 71 note
C7
Pressed or coveredOpenBeginner note
The same chart, written out
Every fingering in words — handy for copying into lesson notes, and it reads aloud properly on a screen reader.
| Written note | Fingering | Beginner |
|---|---|---|
| Low C (C4) | Thumb B key + Left index (key 1) + Left middle (key 2) + Left ring (key 3) + Right index (key 4) + Right middle (key 5) + Right ring (key 6) + Foot C key | Yes |
| Low C♯ (C♯4) | Thumb B key + Left index (key 1) + Left middle (key 2) + Left ring (key 3) + Right index (key 4) + Right middle (key 5) + Right ring (key 6) + Foot C♯ key | Yes |
| Low D (D4) | Thumb B key + Left index (key 1) + Left middle (key 2) + Left ring (key 3) + Right index (key 4) + Right middle (key 5) + Right ring (key 6) | Yes |
| Low E♭ (E♭4) | Thumb B key + Left index (key 1) + Left middle (key 2) + Left ring (key 3) + Right index (key 4) + Right middle (key 5) + Right ring (key 6) + E♭ key (right little finger) | Yes |
| Low E (E4) | Thumb B key + Left index (key 1) + Left middle (key 2) + Left ring (key 3) + Right index (key 4) + Right middle (key 5) + E♭ key (right little finger) | Yes |
| Low F (F4) | Thumb B key + Left index (key 1) + Left middle (key 2) + Left ring (key 3) + Right index (key 4) + E♭ key (right little finger) | Yes |
| Low F♯ (F♯4) | Thumb B key + Left index (key 1) + Left middle (key 2) + Left ring (key 3) + Right ring (key 6) + E♭ key (right little finger) | Yes |
| Low G (G4) | Thumb B key + Left index (key 1) + Left middle (key 2) + Left ring (key 3) + E♭ key (right little finger) | Yes |
| Low A♭ (A♭4) | Thumb B key + Left index (key 1) + Left middle (key 2) + Left ring (key 3) + G♯ key (left little finger) + E♭ key (right little finger) | Yes |
| Low A (A4) | Thumb B key + Left index (key 1) + Left middle (key 2) + E♭ key (right little finger) | Yes |
| Low B♭ (B♭4) | Thumb B key + Left index (key 1) + Right index (key 4) + E♭ key (right little finger) | Yes |
| Low B (B4) | Thumb B key + Left index (key 1) + E♭ key (right little finger) | Yes |
| C5 | Left index (key 1) + E♭ key (right little finger) | Yes |
| C♯5 | E♭ key (right little finger) | Yes |
| D5 | Thumb B key + Left middle (key 2) + Left ring (key 3) + Right index (key 4) + Right middle (key 5) + Right ring (key 6) | Yes |
| E♭5 | Thumb B key + Left middle (key 2) + Left ring (key 3) + Right index (key 4) + Right middle (key 5) + Right ring (key 6) + E♭ key (right little finger) | Yes |
| E5 | Thumb B key + Left index (key 1) + Left middle (key 2) + Left ring (key 3) + Right index (key 4) + Right middle (key 5) + E♭ key (right little finger) | Yes |
| F5 | Thumb B key + Left index (key 1) + Left middle (key 2) + Left ring (key 3) + Right index (key 4) + E♭ key (right little finger) | Yes |
| F♯5 | Thumb B key + Left index (key 1) + Left middle (key 2) + Left ring (key 3) + Right ring (key 6) + E♭ key (right little finger) | Yes |
| G5 | Thumb B key + Left index (key 1) + Left middle (key 2) + Left ring (key 3) + E♭ key (right little finger) | Yes |
| A♭5 | Thumb B key + Left index (key 1) + Left middle (key 2) + Left ring (key 3) + G♯ key (left little finger) + E♭ key (right little finger) | — |
| A5 | Thumb B key + Left index (key 1) + Left middle (key 2) + E♭ key (right little finger) | — |
| B♭5 | Thumb B key + Left index (key 1) + Right index (key 4) + E♭ key (right little finger) | — |
| B5 | Thumb B key + Left index (key 1) + E♭ key (right little finger) | — |
| C6 | Left index (key 1) + E♭ key (right little finger) | — |
| C♯6 | E♭ key (right little finger) | — |
| High D (D6) | Thumb B key + Left middle (key 2) + Left ring (key 3) + E♭ key (right little finger) | — |
| High E♭ (E♭6) | Thumb B key + Left index (key 1) + Left middle (key 2) + Left ring (key 3) + G♯ key (left little finger) + Right index (key 4) + Right middle (key 5) + Right ring (key 6) + E♭ key (right little finger) | — |
| High E (E6) | Thumb B key + Left index (key 1) + Left middle (key 2) + Right index (key 4) + Right middle (key 5) + E♭ key (right little finger) | — |
| High F (F6) | Thumb B key + Left index (key 1) + Left ring (key 3) + Right index (key 4) + E♭ key (right little finger) | — |
| High F♯ (F♯6) | Thumb B key + Left index (key 1) + Left ring (key 3) + Right ring (key 6) + E♭ key (right little finger) | — |
| High G (G6) | Left index (key 1) + Left middle (key 2) + Left ring (key 3) + E♭ key (right little finger) | — |
| High A♭ (A♭6) | Left middle (key 2) + Left ring (key 3) + G♯ key (left little finger) + E♭ key (right little finger) | — |
| High A (A6) | Thumb B key + Left middle (key 2) + Right index (key 4) + E♭ key (right little finger) | — |
| High B♭ (B♭6) | Thumb B key + Right index (key 4) + First (D) trill key | — |
| High B (B6) | Thumb B key + Left index (key 1) + Left ring (key 3) + Second (E♭) trill key | — |
| High C (C7) | Left index (key 1) + Left middle (key 2) + Left ring (key 3) + G♯ key (left little finger) + Right index (key 4) | — |
Alternate flute fingerings
Alternates aren’t “better” fingerings — each one earns its place in a specific musical situation. Select any of these notes in the chart above and switch variants to compare them.
- Low F♯ (F♯4) — F-sharp with right 2: Thumb B key + Left index (key 1) + Left middle (key 2) + Left ring (key 3) + Right middle (key 5) + E♭ key (right little finger). Only for the E–F-sharp trill and fast slurs with E; go back to right 3 for anything sustained or being tuned.
- Low B♭ (B♭4) — Thumb B-flat (Briccialdi lever): Thumb B♭ lever (Briccialdi) + Left index (key 1) + E♭ key (right little finger). Use in flat keys and any passage with no B natural in it — the thumb simply lives on the B-flat lever throughout.
- E5 (E5) — E with the second (E-flat) trill key added: Thumb B key + Left index (key 1) + Left middle (key 2) + Left ring (key 3) + Right index (key 4) + Right middle (key 5) + Second (E♭) trill key + E♭ key (right little finger). Add the second trill key when second-octave E keeps cracking; it steadies the note without changing anything around it.
- F♯5 (F♯5) — F-sharp with right 2: Thumb B key + Left index (key 1) + Left middle (key 2) + Left ring (key 3) + Right middle (key 5) + E♭ key (right little finger). For the E–F-sharp trill and fast slurs from E only; right 3 remains the fingering for sustained notes.
- B♭5 (B♭5) — Thumb B-flat (Briccialdi lever): Thumb B♭ lever (Briccialdi) + Left index (key 1) + E♭ key (right little finger). Use when the passage sits in a flat key and contains no B natural; the thumb stays on the B-flat lever throughout.
Trill fingerings
Trill fingerings trade a little tone quality for speed — use them for rapid alternation, not sustained notes.
- Low D (D4) ↔ E♭4 — Hold low D and shake the E-flat key with the right little finger: Thumb B key + Left index (key 1) + Left middle (key 2) + Left ring (key 3) + Right index (key 4) + Right middle (key 5) + Right ring (key 6) + E♭ key (right little finger)
- C5 (C5) ↔ D5 — Hold C and shake the first (D) trill key with the right index finger: Left index (key 1) + First (D) trill key + E♭ key (right little finger)
- C♯5 (C♯5) ↔ D5 — Shake the first (D) trill key; nothing else is held down: First (D) trill key + E♭ key (right little finger)
- C♯5 (C♯5) ↔ E♭5 — Shake the second (E-flat) trill key for the whole-step trill: Second (E♭) trill key + E♭ key (right little finger)
- D5 (D5) ↔ E♭5 — Hold second-octave D and shake the E-flat key: Thumb B key + Left middle (key 2) + Left ring (key 3) + Right index (key 4) + Right middle (key 5) + Right ring (key 6) + E♭ key (right little finger)
- C6 (C6) ↔ D6 — Hold C and shake the second (E-flat) trill key — the first trill key gives a flat D here: Left index (key 1) + Second (E♭) trill key + E♭ key (right little finger)
- C♯6 (C♯6) ↔ D6 — Shake the first (D) trill key: First (D) trill key + E♭ key (right little finger)
- C♯6 (C♯6) ↔ E♭6 — Press and release both trill keys together: First (D) trill key + Second (E♭) trill key + E♭ key (right little finger)
- High D (D6) ↔ E♭6 — Hold high D and shake the second (E-flat) trill key: Thumb B key + Left middle (key 2) + Left ring (key 3) + Second (E♭) trill key + E♭ key (right little finger)
- High G (G6) ↔ A♭6 — Hold high G and shake the first (D) trill key: Left index (key 1) + Left middle (key 2) + Left ring (key 3) + First (D) trill key + E♭ key (right little finger)
- High A♭ (A♭6) ↔ A6 — Hold high A-flat and shake the first (D) trill key: Left middle (key 2) + Left ring (key 3) + G♯ key (left little finger) + First (D) trill key + E♭ key (right little finger)
Common flute fingering mistakes
- Leaving the left first finger down for D5 and E♭5. That finger is the register vent. Down, it gives a flat, stuffy note that cracks; up, the octave arrives on its own.
- Playing F♯ with right 2. F♯ is a cross-fingering that uses the third right-hand finger. Right 2 gives a badly out-of-tune note, and since F♯ appears in every G-major and D-major exercise, the wrong reflex gets learned early.
- Forgetting the E♭ key — or forgetting to release it. Held for D4 or D5, it turns them into E♭. Missing from anything above E♭4, the pitch collapses and the tone goes dull.
- Blowing harder instead of faster for high notes. Volume is not speed. More force spreads the airstream and drops the note back an octave; a smaller aperture with the same amount of air is what actually lifts it.
Frequently asked questions
How do I read a flute fingering chart?
Filled circles are keys you hold down; open circles stay up. The chart is drawn head joint at the top, foot joint at the bottom: the two thumb keys sit on the back at the top, then the left hand's three keys, then the right hand's three, with the E♭ key and the foot-joint keys for the right little finger at the bottom. The trill keys are the two small levers offset to the right.
Is the flute in C?
Yes. The concert flute is a non-transposing instrument in C, so the note you read is the note that sounds — written A4 is concert A4 at 440 Hz. There is no written-versus-concert conversion to learn, which is why flute players can read straight off a piano part. (Piccolo sounds an octave higher and alto flute is in G, but the standard flute is concert pitch.)
What is the E♭/pinky key rule?
The E♭ key under the right little finger opens a hole rather than closing one, so pressing it raises the pitch. That makes it the little finger's home: it stays down for almost everything from E♭4 upward. It comes off for D4 and D5, it is replaced by a foot-joint lever for C♯4 and C4, and right at the top it is released again for B♭6, B6 and C7. If a note sounds a semitone high, check the little finger first.
Why won't my third-octave notes speak?
Because third-octave fingerings are not the lower ones overblown — they vent the tube to bring out the third or fourth harmonic, so a raised finger in the middle of the hand is doing the work. Get the fingering exactly right, then use faster air through a smaller lip opening, aimed slightly higher across the lip plate. Blowing harder and biting both make high notes thin, sharp and squeaky.
Can I print this chart free?
Yes. The printable PDF comes in Letter and A4, is generated from the same data as this interactive chart, and downloads in one click — no email address, no watermark.
Flute fingering data last updated . Every diagram here, in the printable PDF and in the chart image comes from one dataset, so the paper and the screen cannot disagree.